
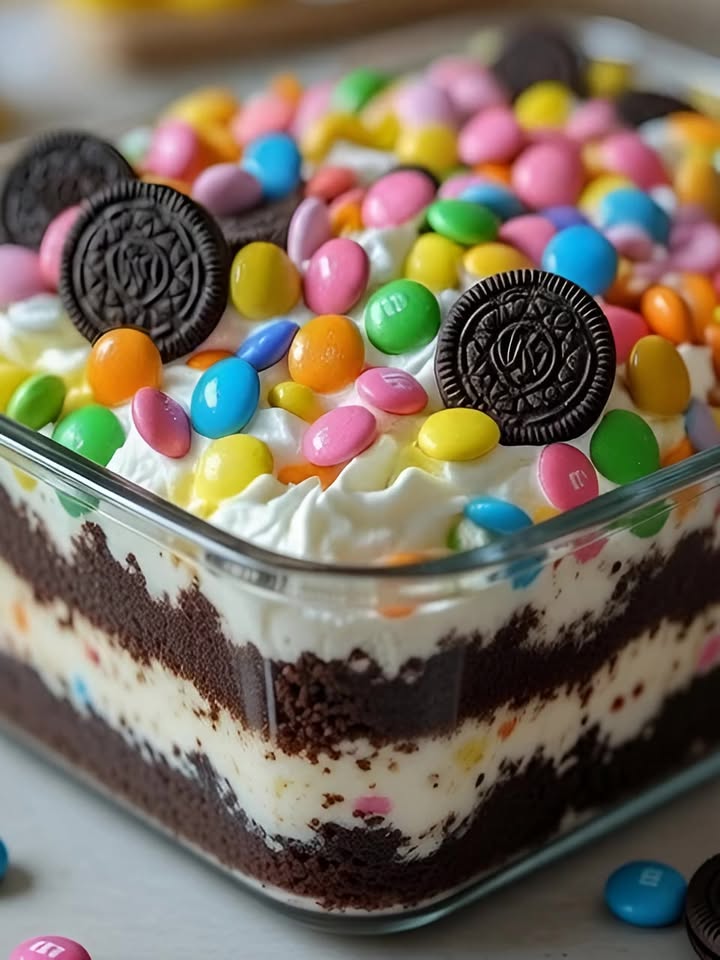
- A firm, pressed Oreo base for clean layering
- A thick, stabilized cheesecake pudding filling
- Distinct, visible layers in a clear glass dish
- A generous topping that matches the photo exactly
- Proper chilling to ensure sliceable structure
It’s designed to look intentional — not just scooped together.
When sliced, you’ll see:
- A dark Oreo crust
- A thick, creamy white layer
- Another defined Oreo layer
- A final creamy top
- Decorative crushed Oreos and candy eggs
Every spoonful gives contrast — creamy and crunchy, sweet and chocolatey.
Ingredient Breakdown (Why Each One Matters)
Oreo Cookies – The Foundation of the “Dirt”
You’ll use a full family-size package (15–16 oz). And yes — you crush them whole. Filling included.
Why?
- The cream inside helps bind the crumbs.
- The chocolate flavor becomes rich and deep.
- It creates the authentic “dirt” look seen in the image.
Pro tip: Pulse in a food processor for fine crumbs. If you want slight texture variation (like in the image), reserve some slightly chunkier pieces for the top.
Cream Cheese – The Structural Backbone
Use full-fat, softened cream cheese.
This is what gives the filling body and stability. Without it, the dessert becomes too soft and loses definition.
Softened is key. If it’s cold, it will clump. You want silky smooth texture.
Instant Vanilla Pudding – The Creamy Lift
Vanilla pudding keeps the filling light and fluffy.
It:
- Adds sweetness
- Stabilizes texture
- Prevents the dessert from becoming heavy
Whisk with cold milk until thickened — but don’t let it sit too long before incorporating.
Whipped Topping – The Airiness Factor
Cool Whip (12 oz, thawed) gives that signature mousse-like texture.
It makes the filling:
- Light
- Spreadable
- Stable for chilling
Fold gently — never aggressively mix.
Candy-Coated Eggs & Mini Oreos – The Easter Personality
This is what transforms a regular dirt cake into an Easter centerpiece.
Use:
- 10–12 mini Oreo cookies (whole)
- 1 cup pastel candy-coated eggs (Cadbury style)
- Extra crushed Oreos for top soil effect
Scatter generously, just like the photo. The top should look abundant, not sparse.
Tools You’ll Need for Professional Results
- Clear 9×9 glass dish (essential for visible layers)
- Hand mixer
- Mixing bowls
- Rubber spatula
- Food processor (optional but recommended)
- Offset spatula for smoothing
That clear dish is not optional if you want the same look as the image.
Step-by-Step Instructions
Step 1: Prepare the Oreo “Dirt”
Crush the entire Oreo package into fine crumbs.
Set aside ½ cup separately for garnish.
Press half of the remaining crumbs firmly into the bottom of your 9×9 glass dish.
Press hard. Use the bottom of a measuring cup.
This ensures a compact base that slices cleanly.
Step 2: Make the Cheesecake Pudding Filling
- Whisk 2 cups cold milk with pudding mix for 2–3 minutes. Set aside.
- In a separate bowl, beat:
- 8 oz softened cream cheese
- 1 cup powdered sugar
Beat for 3 minutes until fluffy and smooth.
- Fold in 12 oz whipped topping gently.
- Add prepared pudding and mix just until combined.
Do not overmix.
The texture should be thick, airy, and spreadable.
Step 3: Build the Signature Layers
Now comes the magic.
Layer 1:
Pressed Oreo base.
Layer 2:
Spread half of the cream mixture evenly.
Smooth carefully to edges for clean glass visibility.
Layer 3:
Add a thick layer of crushed Oreos (do not press too hard).
Layer 4:
Spread remaining cream mixture evenly.
Smooth the top like frosting a cake.
The layers should look distinct through the glass.
Step 4: Decorate Like the Image
Cover the entire top with reserved crushed Oreos.
Place mini Oreos spaced evenly.
Scatter pastel candy eggs generously.
Optional: Add light pastel sprinkles for extra Easter sparkle.
The top should look festive and abundant — not minimalist.
Chilling Is Not Optional
Refrigerate at least 4 hours.
Overnight is best.
This allows:
- Layers to firm up
- Clean slices
- Flavor development
- Stable structure
Cut too early and it will scoop messy.
Texture & Flavor Profile
When properly chilled:
- The bottom layer is firm but not hard.
- The cream is fluffy and smooth.
- The middle Oreo layer adds slight crunch.
- The top is decorative and textured.
Flavor-wise, it’s:
- Sweet but balanced
- Creamy with chocolate contrast
- Rich yet light
- Nostalgic and festive
It tastes like cookies and cream cheesecake mousse.
Professional Tips for Perfect Results
✔ Always soften cream cheese fully
✔ Press base firmly
✔ Chill overnight if possible
✔ Use full-fat ingredients
✔ Decorate generously
✔ Slice with a warm knife for clean cuts
Serving Suggestions
Serve chilled directly from the glass dish.
For clean squares:
- Run knife under hot water
- Wipe between cuts
You’ll get beautiful layered pieces.
Perfect for:
- Easter brunch
- Potlucks
- Spring parties
- Church gatherings


